Navigation device not connecting to computer (MyDrive Connect)
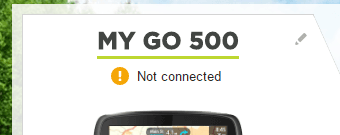
If your navigation device is not recognised by your computer or is shown as "Not connected" in MyDrive Connect, the issue might lay with the connection, the computer or with the device itself.
1. Check the connection
To troubleshoot your device's connection, follow these steps in order:
- Make sure that your device is switched on before you connect it to the computer.
First, perform a soft reset while your device is connected:
Press and hold the On/Off button until your device restarts. Keep the button pressed until you hear the drums, then release it. This can take more than fifteen seconds. - Make sure the cable is connected directly to your device, and not to the mount. If your device has a mount, remove it before connecting the USB cable.
- Connect your navigation device to a different USB port on your computer. You should plug the USB connector directly into a USB port on your computer and not into a USB hub or USB port on a keyboard or monitor.
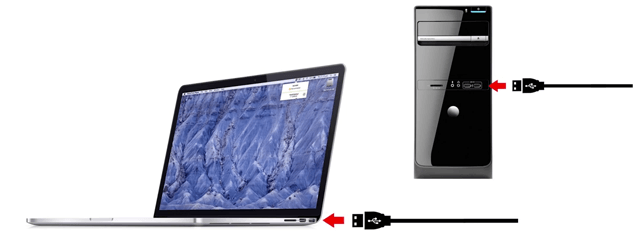
- We recommend that you always use the original USB cable provided with your device, however, in rare cases the USB cable may have developed a fault. To test this, try connecting your device using a different USB cable.
2. Check your computer
Firewalls, antivirus scanners and pop-up blockers can also interfere with MyDrive Connect. It may be necessary to configure your firewall and router to allow MyDrive Connect full access to the internet.
If you are using MyDrive Connect on a business network, for example at your workplace, be aware that your company may have restrictions and access policies that may prevent MyDrive Connect from connecting to TomTom servers.
If the device is still not recognised, the software, or driver, required to detect the device may not be installed correctly. The steps to correct this depend on your operating system:
(For earlier versions of Windows, click here )
Windows 10
- Uninstall the driver.
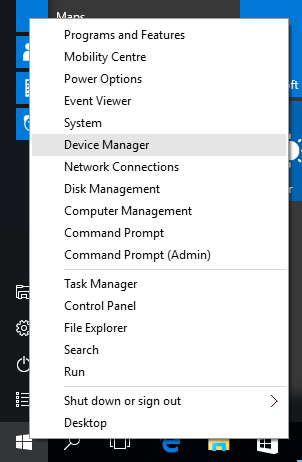
- To do this, open Device Manager by right clicking the Start button and click Device Manager .
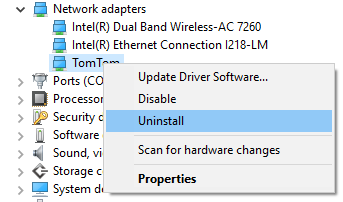
- In Device Manager, double-click Network adapters to open it. Right-click TomTom and click Uninstall .
- Tick the box in the confirmation window to confirm that the driver software will be deleted and click OK .
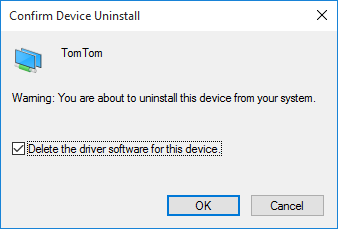
- To do this, open Device Manager by right clicking the Start button and click Device Manager .
- Disconnect the device from the computer.
- Uninstall MyDrive Connect.
- Right-click the Start button and click Apps and Features .
- Find MyDrive Connect in the list, select it and then click Uninstall .
- Restart the computer.
- Reinstall MyDrive Connect.
For instructions on how to install MyDrive Connect see: Installing MyDrive Connect - Reset your device again:
Press and hold the On/Off button until your device restarts. Keep the button pressed until you hear the drums, then release it. This can take more than fifteen seconds. - Reconnect your device to the computer.
Windows will automatically update the latest drivers for your device and MyDrive Connect should now recognise your device.
If your device is still not recognised, click here to go to the next section .
macOS
If your computer fails to assign the driver automatically, you can install it by following the steps below.
- Click on the Apple menu in the top left hand corner of your screen and choose System Preferences .
- Open Network or Modem . The navigation device is listed as a network card or as a modem.
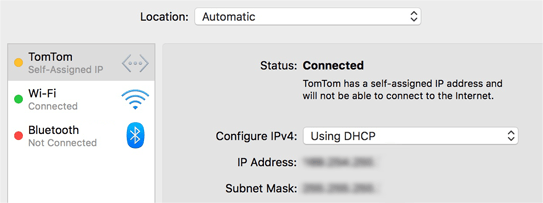
If your navigation device is not listed, add it in the following way:
- Click the plus (+) button at the bottom left and select the TomTom Interface.
- Click Create , then Apply .
If your navigation device is listed, check the status in the following way:
- A yellow/orange status your navigation device is correctly installed.
- A red status means your navigation device is not correctly installed. Follow these steps to change the status:
- Select the navigation device.
- On the right side, click on advanced.
- Click on Renew DHCP-lease.
- Click OK .
The status should now be yellow/orange.
3. Get help for your device
If your device is still not recognised after going through the steps in the previous sections, the issue may lie with the device itself. In this case it's best to contact our technical support to verify the troubleshooting and get help resolving this.